
Adding users to a Microsoft Business Subscription means creating accounts in the Microsoft 365 admin center, assigning licenses, and configuring roles so each person gets full, compliant access to services. This process, formally called user provisioning, is the foundation of identity and access management in any Microsoft 365 tenant. Done correctly, it keeps your organization aligned with compliance standards like HIPAA, SOX, and FERPA. Done carelessly, it creates security gaps and audit failures. This article covers every step, from prerequisites to automation, so IT administrators and business owners can manage Microsoft business users without errors.
What do you need before you add users to a Microsoft 365 subscription?
Three things must be in place before you touch the admin center: the right permissions, enough licenses, and a validated domain.
Admin permissions determine what you can do. The Global Administrator role has full access. The User Administrator role covers most provisioning tasks and is the safer choice for day-to-day work. Custom roles can restrict access further if your organization uses role-based access control. Assigning the minimum role needed for the task is standard practice under Zero Trust guidelines.

License availability is non-negotiable. Every user you add needs an assigned license to access Microsoft 365 services. Check your available license count under Billing > Licenses in the admin center before starting. If you are unsure which plan fits your team’s needs, reviewing the Microsoft 365 Business plans helps clarify which tier covers the features you need.
Domain validation confirms that your organization’s domain is verified in DNS. Without it, user principal names (UPNs) will default to the onmicrosoft.com domain, which looks unprofessional and can cause mail routing issues.
Tenant synchronization status also matters. Cloud-only tenants create users directly in the admin center. Hybrid environments that use Microsoft Entra Connect sync users from on-premises Active Directory. Attempting to create a synced user manually in the cloud causes conflicts.
- Confirm your admin role in Users > Active users > your account
- Check license counts under Billing > Licenses
- Verify domain status under Settings > Domains
- Identify whether your tenant is cloud-only or hybrid before provisioning
Pro Tip: If you manage a hybrid environment, always create new users in on-premises Active Directory and let the sync cycle push them to the cloud. Creating them in the cloud first causes a sync conflict that requires manual cleanup.
How to add a single user and assign a license in the admin center
Adding one user through the Microsoft 365 admin center takes about five minutes when you have the prerequisites in place. The Add a user wizard walks you through identity, license, and role configuration in a single flow.
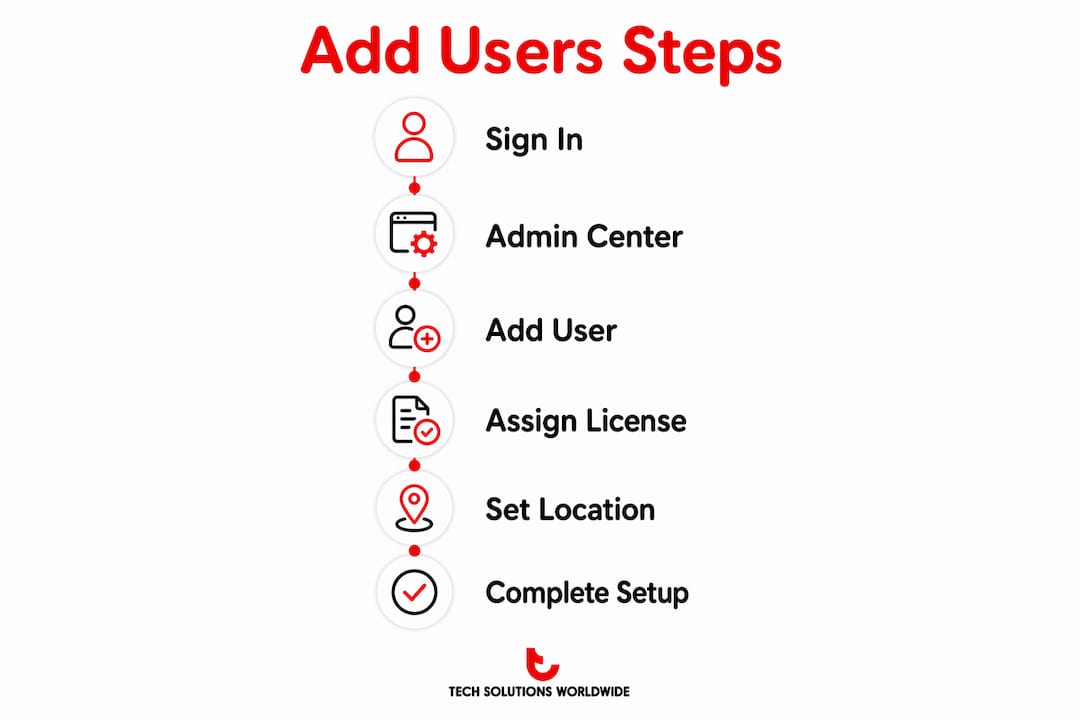
- Sign in to admin.microsoft.com with a Global Administrator or User Administrator account.
- Go to Users > Active users, then select Add a user.
- Enter the user’s first name, last name, display name, and username. The username becomes the user’s email address and sign-in ID, so get it right the first time.
- Set the usage location. Usage location is mandatory for license assignment to succeed. Skipping it causes a silent failure where the license appears assigned but the user cannot access services.
- Assign a license from the available pool. Select only the license the user actually needs.
- Set the role. The default is “User (no admin center access),” which is correct for the vast majority of accounts.
- Choose whether to auto-generate a password or set one manually. Use the option to send credentials to an alternate email address for secure delivery.
- Review all settings on the summary screen, then select Finish adding.
Mandatory fields for user setup include first and last name, display name, username, domain, usage location, and role. Missing any of these fields creates provisioning failures or compliance gaps.
Pro Tip: After adding the user, wait up to 24 hours for Exchange Online mailbox provisioning to complete. SharePoint and Teams access typically activates within minutes, but the mailbox follows its own provisioning queue.
Service provisioning times vary by workload. Teams and SharePoint activate quickly. Exchange Online mailboxes can take up to 24 hours. Inform new users of this delay so they do not report a service outage on their first day.
How to add multiple users efficiently with bulk upload
Adding users one at a time works for small teams. For larger batches, the Microsoft 365 admin center supports CSV import and group-based licensing.
Using the CSV bulk upload method
- In the admin center, go to Users > Active users and select Add multiple users.
- Download the CSV template provided by Microsoft. The template includes required columns: username, display name, first name, last name, and usage location.
- Fill in the template. Every row represents one user. Do not leave the usage location column blank.
- Upload the completed CSV file and review the validation results. The admin center flags rows with errors before processing.
- Assign licenses to the imported users. The UI supports batch license assignment up to 20 users at a time. For larger batches, group-based licensing is the correct tool.
| Method | Best for | License assignment |
|---|---|---|
| Add a user wizard | 1–5 users | Manual, per user |
| CSV bulk upload | 6–300 users | Batch, up to 20 at a time |
| Group-based licensing | 20+ users, ongoing | Automatic via group membership |
| Microsoft Graph PowerShell | Enterprise automation | Scripted, fully automated |
Common CSV errors include missing usage location, duplicate usernames, and unsupported characters in display names. Fix these in the CSV before re-uploading. The admin center does not partially process a file with errors.
For organizations that need to add team members to Office 365 on a recurring basis, such as during onboarding cycles, the Microsoft Graph PowerShell SDK is the current recommended scripting method. It replaces the legacy MSOnline and AzureAD modules, which Microsoft has retired.
How does group-based licensing work in Microsoft Entra ID?
Group-based licensing is the most efficient method for managing licenses at scale. It assigns licenses automatically to every member of a security group in Microsoft Entra ID. When a user joins the group, they get the license. When they leave, the license is removed. No manual steps required.
Group-based licensing reduces manual errors and eliminates the overhead of one-by-one assignment. For growing organizations, this is the difference between a manageable process and a recurring administrative burden.
Setup steps:
- In the admin center, go to Billing > Licenses and select the license you want to assign.
- Choose Assign licenses and select a security group rather than individual users.
- Confirm the assignment. Microsoft Entra ID processes group membership and assigns licenses within minutes.
- Monitor the Licensed users tab for assignment errors, which appear when a user lacks a usage location or when licenses run out.
Potential issues to watch:
- Overlapping licenses occur when a user belongs to two groups that both assign the same service plan. This wastes licenses but does not break access.
- Service dependencies mean some plans require another plan to be active. For example, Exchange Online requires a base license with identity services.
- License shortages block assignment for all new group members until you purchase more seats.
For organizations choosing between Entra ID Plan 1 and Plan 2, group-based licensing is available in both plans, but Plan 2 adds Privileged Identity Management, which is critical for role governance.
Common mistakes to avoid when managing Microsoft business users
Most provisioning errors fall into a small set of repeatable patterns. Knowing them in advance prevents hours of troubleshooting.
Assigning Global Administrator to every IT staff member is the most common and most dangerous mistake in Microsoft 365 user management. The default ‘User’ role is correct for 99% of accounts. Elevated roles require Privileged Identity Management to comply with Zero Trust and CISA guidelines.
- Skipping usage location: License assignment silently fails when usage location is not set. The admin center UI flags this, but API-based provisioning may not. Always set usage location before assigning a license.
- Misclassifying employees as guest users: Guest users invited via Entra ID B2B do not consume paid licenses. Labeling employees as guests to save license costs creates audit and compliance failures. Every full-time employee needs a properly licensed account.
- Skipping naming standards: Using a consistent display name format like “Last, First (Department)” keeps the directory clean and makes audits faster. Setting this standard at the start of a deployment is far easier than reformatting thousands of accounts later.
- Ignoring provisioning confirmation: After adding a user, verify that the license shows as “Active” under the user’s account. A status of “Pending” or an error badge means the assignment did not complete.
Treat user creation as a compliance event, not a routine task. Skipping steps in the provisioning process creates gaps that surface during regulatory audits.
Key Takeaways
Correctly provisioning users in Microsoft 365 requires proper admin roles, valid licenses, a set usage location, and a default “User” role assignment for the vast majority of accounts.
| Point | Details |
|---|---|
| Set usage location first | Missing this field causes license assignment to fail silently, blocking service access. |
| Default to the User role | Assign Global Admin only when necessary and always pair it with Privileged Identity Management. |
| Use group-based licensing at scale | Automate license assignment via security groups in Microsoft Entra ID for teams larger than 20. |
| Classify users correctly | Guest accounts do not consume paid licenses; misclassifying employees as guests creates compliance risk. |
| Apply naming standards early | A consistent display name format prevents directory clutter and simplifies future audits. |
What Technology Solutions Worldwide has learned from managing Microsoft 365 tenants
After working with organizations ranging from government agencies to enterprise clients, the pattern is consistent: the tenants with the fewest problems are the ones that treated user provisioning as a governed process from day one, not an afterthought.
The single most impactful decision is role assignment. Giving Global Administrator access to every IT staff member because it is convenient is a security liability. Privileged Identity Management exists precisely to give elevated access on demand, with an audit trail, and then remove it. Organizations that skip PIM almost always have over-privileged accounts sitting idle, which is exactly what attackers look for.
Group-based licensing is the second area where early decisions pay off. Organizations that start with manual, per-user license assignment eventually hit a wall when headcount grows. Migrating to group-based licensing after the fact means auditing every existing user, correcting mismatches, and rebuilding group structures. Starting with groups from the beginning costs almost nothing extra and scales without friction.
The compliance angle is underestimated. Skipping usage location, misclassifying guest users, or using inconsistent naming conventions are not just administrative inconveniences. They create findings in SOX, HIPAA, and FERPA audits. Auditors look at your directory and your license reports. A clean, consistently provisioned tenant signals a mature IT operation. A messy one signals risk.
— Technology Solutions Worldwide
Microsoft licensing support from Technology Solutions Worldwide
Managing licenses across a growing organization gets complicated fast, especially when compliance requirements are involved.
Technology Solutions Worldwide is a certified Microsoft Solutions Partner with over 20 years of experience in Microsoft licensing support and migration services. The team works with organizations of all sizes, including government agencies and enterprise clients like Coca-Cola and T-Mobile, to plan, provision, and manage Microsoft 365 environments correctly. Clients receive 20–30% discounts off standard Microsoft subscription pricing. For organizations that need help selecting the right plan before adding users, the Microsoft 365 for Business resource covers plan tiers, security roles, and data management in detail. Contact Technology Solutions Worldwide to get licensing guidance before provisioning errors become compliance problems.
FAQ
How do I add users to a Microsoft Business subscription?
Sign in to admin.microsoft.com, go to Users > Active users, and select Add a user. Complete the identity fields, set the usage location, assign a license, and set the role before saving.
What role should I assign when adding a new user?
The default “User (no admin center access)” role is correct for the vast majority of accounts. Assign elevated roles like Global Administrator only when required, and pair them with Privileged Identity Management.
Can I add multiple users at once in Microsoft 365?
Yes. Use the Add multiple users option with a CSV file for batches up to a few hundred accounts. For ongoing, large-scale provisioning, group-based licensing in Microsoft Entra ID automates the process.
Why is usage location required when assigning a license?
Microsoft requires usage location to comply with regional data residency and service availability rules. Without it, license assignment fails silently and the user cannot access Microsoft 365 services.
What is the difference between a guest user and a licensed user?
Guest users are invited via Entra ID B2B collaboration and do not consume paid licenses. Licensed users are full members of the tenant with assigned subscriptions. Classifying employees as guests to avoid license costs creates compliance and audit failures.
Recommended
- Managing Microsoft Azure Subscriptions – Technology Solutions
- Business premium subscription of Microsoft 365
- Microsoft Subscriptions-Techsolworld
- Microsoft Business License Renewal Process: 2026 Guide
VIEW A COMPLETE LIST OF MICROSOFT BUSINESS LICENSES HERE.